Thinking about teaching in Canvas in Spring ’18? If you are planning on using the winter break to migrate a course into Canvas, this page outlines your critical steps. We recommend focusing on migrating one course at a time as you’re first getting started.
- Download and organize your files from CampusCruiser. For more information, watch Moving Content from Cruiser to Canvas. Organize your materials into well-named, weekly or module folders in your OneDrive or a desktop folder.
- Check the files for accessibility;
- Use good naming conventions for documents and folders and upload them into Canvas.
- Log into http://canvas.widener.edu.
- With Canvas open in one window, watch a short Canvas walk-through demo of the dashboard and course template in another.
- Begin to customize your course.
- Customize the landing page and other course components you want to use.
- Consider building out the welcome/review module as your first step.
- If you get stuck, use the excellent, live 24/7 Faculty Help via chat or phone. It’s good! (To connect, click on the Help button within your Canvas course.)
- Log into some of the live interactive Canvas training provided at https://www.cysalesteam.com/instructure/calendar. (Use the logins provided through your dean’s office.)
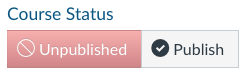
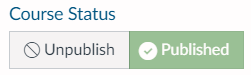
Remember: students won’t be able to see your course while it’s under construction. Once your course is ready to go, you’ll click the Publish button in the upper right corner of the landing page.